

Soil Health Census Instructions
INSTRUCTIONS FOR COLLECTING SOIL SAMPLES
Provided Materials
6 inch ruler
Labeled gallon plastic bags
Instructions (printed or digital)
Shipping boxes with pre-paid labels
Not Provided
Shovel (preferably a spade/sharpshooter)
Bucket
Trowel or butter knife
Protocol:
- Gather materials and head out to the field. You will need everything from the list above except the shipping boxes.
- Choose your sampling locations. Choose two sampling locations on your farm: a "low" performance location and a "high" performance location.
- Record your first location and take photos. If you have a smart phone, please complete the survey (<1 minute) described in Figure 1 to capture pictures and GPS coordintes of your sampling location. If you do not have a smartphone, see Figure 1 for alternatives.
- Collect your soil cores. Begin at least 30 ft in from the edge of your field. Walk in a "W" shape, collecting two soil cores at each corner (see Figure 2). Your "W" should be approximately 30x30 ft.
- Dig a hole in the ground, a little over 6 inches deep. Take a vertical slice from one side of the hole to straighten the side, discard. Take another vertical slice and continue with the protocol.
- Use your trowel or butter knife to cut away the tapered sides of the slice, leaving a uniform, straight sided core. Cut off and discard soil from below the top 6 inches (see Figure 3).
- Place the core in your bucket.
- Collect two cores at each corner in the "W", totaling 10 cores.
- Homogenize and bag up your soil. Break up the soil cores in your bucket and mix to homogenize. Transfer 4-6 cups of soil to the corresponding pre-labeled plastic bag. The bag should be about one third of the way full. Dump the extra soil back into your field.
- Repeat steps 3-5 at your second location. To re-take the survey in step 3, either refresh your browser or scan the QR code a second time.
- Storage. No need to refrigerate the samples, but please store them in a cool, dry place out of direct sunlight until shipping.
- Ship samples within 24 hours. Double bag each sample and place them in the provided USPS flat rate shipping box. Affix shipping label. Drop off at any US post office.
Thank you for participating in this initiative! Please direct any questions about supplies or this protocol to Annie Benson (benso130@purdue.edu) or Yichao Rui (765-496-2173).

Figure 1. QR code and URL for a survey used to record photos and GPS coordinates of your sampling locations. We will use location data to determine soil type.
If you do not have a smart phone, please take note of the sampling location in another way so you can communicate it to our team. Example: Collected the "high" performance sample about 100 ft north from Highway 999 and 200 ft east from Indiana Street in West Lafayette, IN.
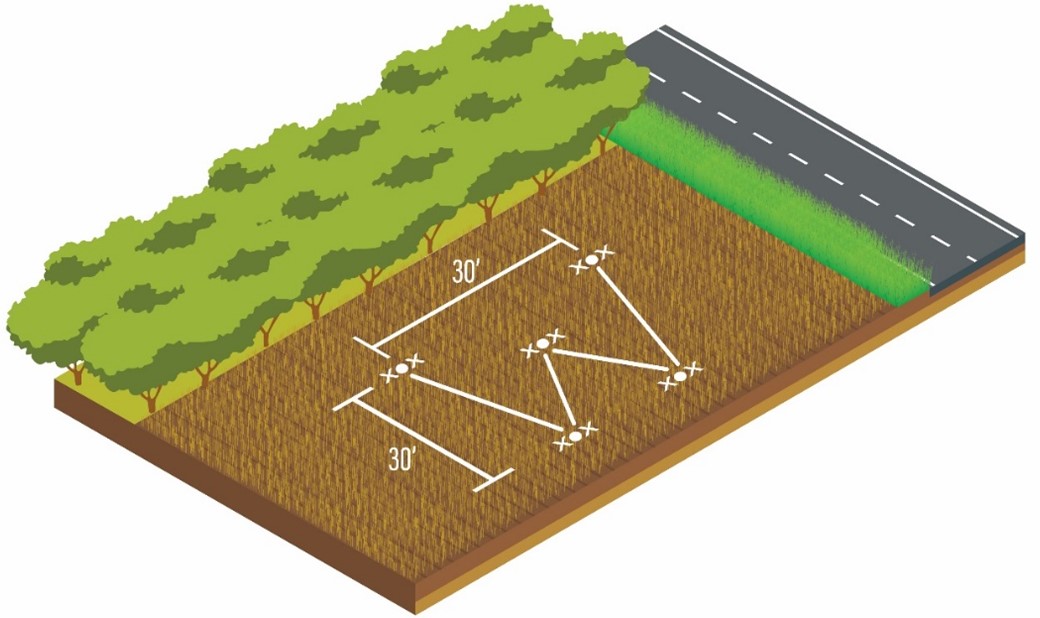
Figure 2. Example of a "W" shaped walk through a field. Please note that your results will be easier to interpret if you avoid crossing soil type boundaries while collecting a sample. If possible, use a soil map to stay within one soil type. If you do not have a map, use soil color as a clue. Soil texture can vary within a soil type, but the color should stay relatively consistent. If a soil core is a significantly different color from the rest, throw it out and try again closer to your other samples.

Figure 3. How to cut soil samples to size. Please trim your shovel full of soil down to a straight sided core - even in width from top to bottom.