In The Skinny on Microgreens – Part 1, we explored the importance and benefits of the increasing interest nationwide in microgreens (MGs) as a source of fresh food grown right at home. Growing MGs indoors brings a harvest year-round of delicious, nutrient-dense plants. We can use them in recipes wherever we would add fresh herb and vegetable ingredients, from soup to stir frys and salads to sandwiches. In Part 2 we’ll describe the supplies and steps to follow to yield a bountiful bowlful of fresh greens in just 7 to 21 days for around $1.00 per ounce. Let’s do this!
Supplies
- A matched pair of BPA-free growing trays deep enough to hold 1” of soil: one with holes and the other without holes.
- Growing medium such as:
- Fresh, sterilized potting soil or coco peat for growing traditionally, or
- Growing mats for growing hydroponically that are made from coconut coir, hemp, bamboo, dedicated synthetic materials, or stainless steel screens.*
- Spray bottle filled with filtered or bottled water for initial top watering. Extra for bottom-watering later.
- Select seeds free of chemical residues
- Weighted object (to place over the tray “lid” that is often set over bigger seeds to aid germination and strengthen them in days 1 to 3).
- Clean scissors or sharp knife for harvesting.
- Optional: diluted hydrogen peroxide or baking soda solution to deter mold.
- Optional: indoor grow lights.
Planting Notes
“Micro farmers” perfect their processes based upon the temperature, humidity, ambient light, air flow, and other unique characteristics of their environment. Professional growers strive for temperatures of 68 to 72 degrees and less than 50% humidity; home growers should be mindful not place their plants too close to the temperature variations posed by HVAC systems or “micro climates” near windows. While the former use sophisticated lighting systems over the shelves of greenhouse racks, the latter may only need to provide supplemental lighting when a minimum of bright-medium sunlight is not available. Conversely, MGs grown outdoors during the warmer months usually need shading from direct sunlight. We want MGs to stretch towards a light source to form their unique plant structure. This elongation makes them different from typical herb and produce seed-starts that are more compact as they mature. We want MGs to be leggy!
Fertilization is not needed to successfully grow MGs as the seed itself is a storehouse for all of the nutrients needed to produce the first, seed leaves (cotyledons) and emerging true leaves of microgreens. Most crops (except pea shoots) are harvested when the plant is 2 to 4 inches tall and any true leaves are just emerging. Pea shoots are tender and delicious when harvested much taller with 2 or more sets of true leaves; lemongrass, wheat grass, and other grains grow tall before cutting as well. Generally speaking, MGs become bitter the longer they grow. This is especially true for sunflowers. To harvest all types of MGs, cut the stems about 1/4" above the soil line or grow medium, using scissors or a very sharp knife for best results.
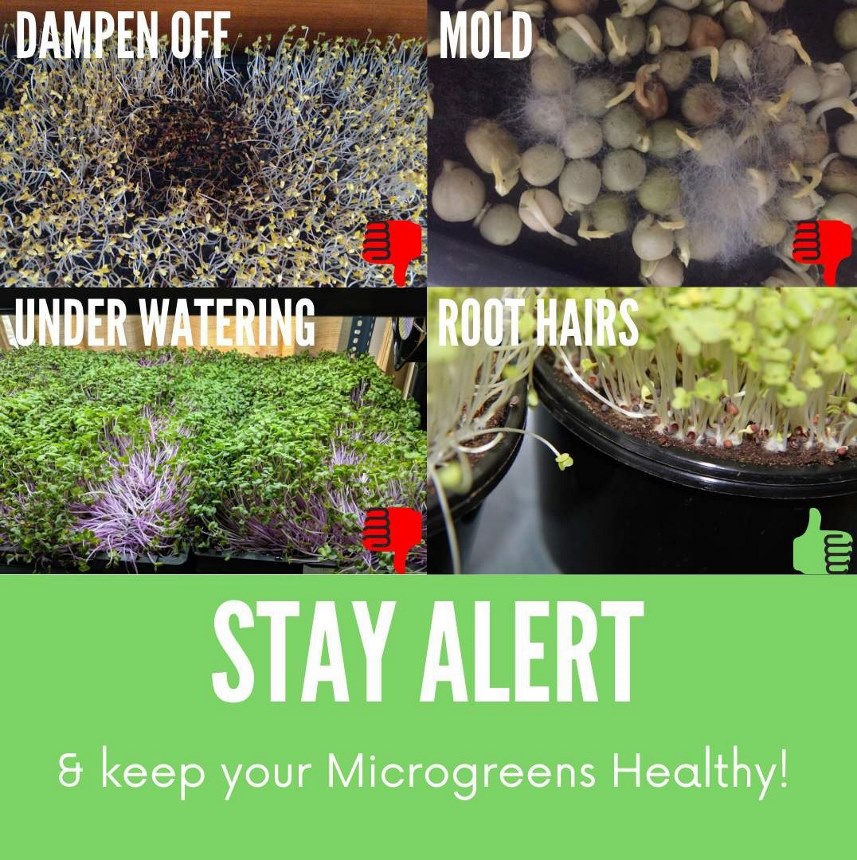
Freshly harvested MGs can last about a week when stored unwashed in the refrigerator and washed right before eating. As in food production, keeping all supplies clean and sanitized is the key to avoiding contamination from mold and pathogens. Also, never use garden soil indoors unless sterilized first! Some signs to watch out for are pictured below. “Root hairs” emerging from the panicle of the seed is normal whereas mold is not! Purdue Extension provides guidance on 1) sanitation from start-to-finish offered to farmers of all types and 2) to home growers after harvest. In the interest of sustainability, growing media or substrates (except stainless steel screens) are not re-usable although many are compostable along with the unused plant roots. Further, MGs and roots can become a nutritious food supplement for chickens and other farm animals as well.

Step by Step
Brooke Edmunds of Oregon State University created the poster above that depicts the general sequence for growing microgreens in soil and hydroponically. (Download the poster HERE.) For growing in soil, the Ramsey County Master Gardeners of Minnesota endorse this educational video from Susan in the Garden. Note that re-using growing substrates can increase the risk of mold developing and thus is not the method of choice for commercial micro farmers.
MG growing kits are also available to help get you started and are an easy way to introduce MGs to children. Pre-measured components including seed, soil*, or hydroponic systems* simplify the growing process. And when crafting your own indoor micro garden, a Seed Density Calculator can be helpful in calculating how much seed to use. This Calculator is an easy tool for home growers to use and is adjustable for various tray sizes. The developer from Atomic Greens recommends experimenting to find the optimal seed-to-substrate ratios for your application.
Ah yes, isn’t experimentation what makes gardening so much fun?
Popular Sources for MG Seeds*
*Examples that the author has sampled with success.